Infinitode Tips
Posted: , Updated:Infinitode (“infinite tower defense”) is an Android tower defense game.
Things I like:
- Focus on gameplay, not graphics
- It runs really fast - it doesn’t lag, ever, even when there’s lots of mobs and towers on screen.
- Global upgrade tree
- Bonus tile system - bonuses for building specific towers in specific spots
- Custom maps
Things I’m hoping will improve:
- In-game documentation - some game mechanics are poorly explained, or not explained at all
- Tower balance - some towers are clearly better than others. (Tesla towers are a part of literally every late-game strategy. Multishot towers are never used at all.)
There’s a (small) Reddit community r/infinitode for the game, where some tips, tricks, and information are exchanged.
Some of those tips and tricks, and my own experiences, are given below.
Tower specifics
Air tower
The air tower has a chance to apply the “burning” effect on each mob it hits.
The “burning” effect is like poison - it does damage over time.
The “burning” effect is very strong, because the damage is a percentage of total hit points. So an air tower can kill air units very quickly, even if they have a lot of hit points!
Exploit this by:
- Building three or four air towers to cover the track.
- Upgrading range, firing speed, and turning/projectile speed. You don’t need to upgrade damage, as the “burning” effect will do more damage than the bullets themselves.
- Setting the targeting mode to “Random”, to apply the “burning” effect to as many air units as possible.
- Buying the global upgrades “Burn duration”, “Ignition chance”, and “Fire damage”.
Freeze towers
Freeze tower stats:
Freezing percentage: the amount that mobs are slowed by. Higher is better. 25% freezing percentage -> 75% move speed.
The maximum possible freeze percentage is 45.6% with the global upgrade “Strength of freezing V”.
Freezing time: how long it takes to slow down a mob, once it enters the freeze tower’s radius.
Defrosting time: how long it takes a mob to speed up, once it leaves the freeze tower’s radius.
Freeze towers help by slowing enemies down, so towers can get more shots at them before they move out of range.
Freeze towers also increase the damage of area-effect towers, like the cannon and missile towers, by reducing the distance between mobs.
Freeze towers give specific bonuses to Tesla and venom towers, when attacking frozen enemies:
- Tesla towers: more enemies hit by chain lightning.
- Venom towers: venom lasts longer.
If there are multiple freeze towers on a single mob, the freezing percentage does not stack, but the rate of freezing does.
Question 2: Do Freeze Towers stack their Freezing % or do they work like the Venom Towers where every additional debuff after the first does 50% of its value?
Answer: Enemies are slowed down by the most powerful Freezing tower in range. If enemy comes to range of two freezing towers - 30% frz & 40%frz - it will slow down up to 40%. But if there are 2 or more Freezing towers in range, enemy will slow down in less time.
Splash towers (orange)
The splash tower shoots projectiles in all directions.
The accuracy statistic is critically important - a high accuracy greatly increases the total damage output.
Essentially, the higher the (accuracy) percent, the more likely the next shots will be aimed precisely in the paths to hit the enemy it’s aiming at. Source
Splash towers get bonus damage against fast (yellow triangle) and light (blue diamond) enemies, which take reduced damage from other common towers. They are very good when placed inside turns, so they can cover more of the path. Combine with freeze and stun towers to increase the number of hits.
Tesla towers
The Tesla chain damage works like this:
Question 1: For Tesla, is the Chain Damage % a factor of the Damage as a whole or is it a static number? For Example: Tower Damage: 100 Tower Chain Damage %: 32 does this mean the first enemy hit gets 100 damage and any enemy hit by the chain gets (100 x 0.32 = 32) 32 damage? Or does that 100 get split so that the first enemy hit gets 68 damage and every enemy hit by the chain gets 32 damage?
Answer: Tesla towers give 100% damage to the first enemy it hits and 32% for each enemy in the chain. If it deals 100 damage to the first enemy, then 2-nd, 3-rd and others take 32 damage - damage multiplies once.
Note that with the “Chain lightning damage V” global upgrade, and Level 10 upgraded towers, the chain lightning damage is 66.2%. If you build the tower on a tile with the 150% chain lightning bonus, that increases to 99.2%. That means the tower does (nearly) full damage to every enemy hit by the chain lightning.
Venom towers
Mobs can be hit by multiple venom effects at the same time.
- The strongest venom effect does full damage.
- The second strongest venom effect does 50% damage.
- The third strongest venom effect does 25% damage, and so on.
The strength and duration of each venom effect is tracked separately.
Blast towers
Blast towers stun mobs, so they can’t move.
Mobs become resistant to the stun effect. A mob which has been stunned once will be hard to stun again.
It’s not clear how stun resistance works, i.e. if the resistance fades with time, or if using more than one stun tower would help.
The bonus mob
The bonus mob is a yellow, star-shaped mob.
Killing it will give coins, green papers (global upgrade money), extra lives, or free global upgrades (!!!).
The bonus mob is resistant to most towers, taking only 2% damage.
Each bonus mob has a weakness vs a specific tower. This is shown by an icon of that tower, above the mob. For example, if the bonus mob has an icon of a Multishot tower above it, you can use a Multishot tower to do full damage to it.
The weakness is randomly picked from the five towers you have built the least. (It’s not clear if this is counted by number of towers, or value of towers.)
You should set some of your towers to “Weak” or “Random” targetting, so the towers don’t focus on the bonus mob.
Statement 1: the “special” enemy added in the previous update tend to ruin many peoples great games because towers always focus them regardless of wether they are set to First, Strong, Weak or Random.
Answer: Bonus enemies have many HP points so “weak” or “random” aim strategy will make it possible to kill other enemies. Bonus enemies give many coins / restore health / give many green papers / unlock random Global Upgrade for free, so their presence is worth it.
Global upgrades
You can buy global upgrades from the main menu, under “Upgrades”.
Upgrades are bought using “green papers”, which are awarded for reaching certain numbers of waves, and at the end of each game.
Upgrades available for all types of tower:
- Maximum tower (XP) level
- Maximum upgrade level
- Range
- Experience
- Build cost reduction
- Upgrade cost reduction
Upgrades available for most types of tower:
- Damage per shot
- Attack speed (shots per second)
- Rotation and projectile speed
Upgrades to specific towers:
- Freeze tower: freeze percentage, freeze speed, etc.
- Tesla tower: chain lightning damage percentage, chain lightning length, etc.
Upgrades to things that aren’t towers:
- Amount of coins gained for finishing wave early
- Time delay between waves
- Amount of global upgrade money (“green papers”) gained after each game
- etc.
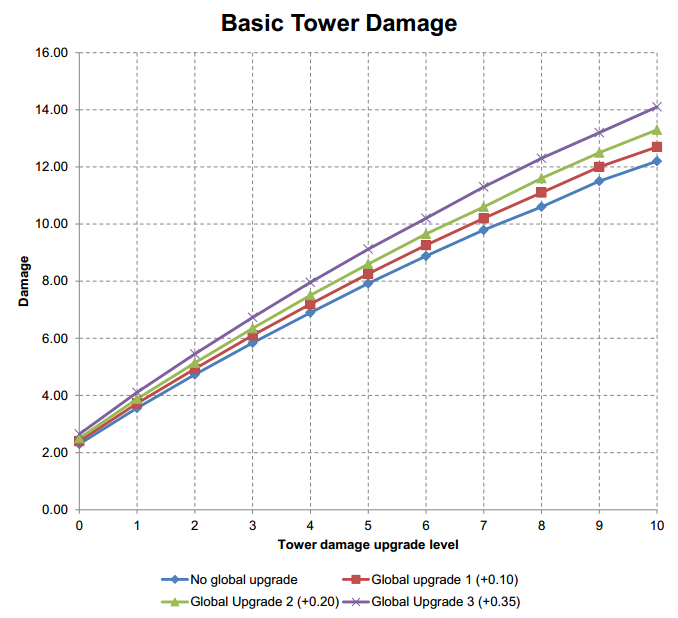
Bonus amounts
The bonuses from global upgrades are not explained well.
Firstly, the bonuses scale with tower upgrades; so the bonuses are actually better than they first appear.
Take the “basic tower” as an example.
The basic tower starts with 2.30 damage per shot.
Buying the global upgrade “Damage I” for the Basic tower grants +0.10 damage to an un-upgraded tower.
The bonus scales as you upgrade each individual tower, from damage level 0 to damage level 10 (MAX). i.e. the “+0.10 dmg” bonus actually gives a +0.500 bonus at level 10.
Secondly, the bonuses do not stack.
- You can buy basic tower global upgrades:
- Damage I (+0.100 dmg)
- Damage II (+0.200 dmg)
- Damage III (+0.350 dmg)
- Damage IV (+0.500 dmg)
- Damage V (+0.650 dmg)
- Buying the Damage II upgrade gives a total bonus of +0.200 dmg.
- Damage I does not stack with Damage II, etc.
Some data collected in-game is tabulated below.
| Damage level | No global upgrade | Global upgrade 1 (+0.10) | Global Upgrade 2 (+0.20) | Global Upgrade 3 (+0.35) |
|---|---|---|---|---|
| 0 | 2.30 | 2.40 | 2.50 | 2.65 |
| 1 | 3.56 | 3.72 | 3.88 | 4.11 |
| 2 | 4.73 | 4.93 | 5.14 | 5.45 |
| 3 | 5.84 | 6.10 | 6.35 | 6.73 |
| 4 | 6.90 | 7.20 | 7.51 | 7.96 |
| 5 | 7.92 | 8.26 | 8.60 | 9.12 |
| 6 | 8.88 | 9.26 | 9.65 | 10.20 |
| 7 | 9.79 | 10.20 | 10.60 | 11.30 |
| 8 | 10.60 | 11.10 | 11.60 | 12.30 |
| 9 | 11.50 | 12.00 | 12.50 | 13.20 |
| 10 | 12.20 | 12.70 | 13.30 | 14.10 |
Global upgrades strategy
See reddit thread:
- Higher level upgrades are very expensive. So focus on cheap upgrades first. It’s more effective to buy level I of every upgrade, than to buy level V of one upgrade.
- Focus on upgrades for the towers you use most. (i.e. Tesla.)
- The “Forced wave bonus” and “Wave delay” upgrades increase your coin income in the early game, letting you build more towers quickly.
- The “Upgrades price” global upgrades are very good. “Upgrades Price V” reduces upgrade costs by 20%, meaning you can build five fully-upgraded towers for the cost of four.
Gameplay strategies
- Multiple (weaker) towers are more effective than one strong tower. Three level 7 Tesla towers are better than one level 10 Tesla tower.
- Freeze towers are cheap, and help other towers do more damage.
- Combine freeze and blast (stun) towers to stop mobs at a specific point. Then use area-effect towers, i.e. cannon, to do damage to entire clumps of enemies at once.
- The freeze, blast (stun), and splash towers affect a circular area around them. Build these at corners and hair-pin turns, to maximise their coverage of the path.
- Tesla towers are very versatile - they hit air and ground, do decent damage to all enemy types, and hit multiple enemies at a time. A valid late-game strategy is “build as many Tesla towers as you can”.
- Use the different targeting modes.
- Venom towers on “Random”, so they apply the poison effect to as many mobs as possible.
- Air towers on “Random”, so they apply the burning effect to as many air mobs as possible.
- Minigun towers on “Strong”, so they fire continuously (minimising the amount of time spent spinning-up.)
Custom map design
Custom maps should be designed so towers can hit multiple sections of the track - i.e. the beginning, middle, and end of the track.
It also helps if the track incorporates lots of bends and turns. This lets towers cover more of the track. It particularly helps the effectiveness of area-effect towers like the freeze, blast, and splash towers.
One way to do this is to build a space-filling curve, such as the Hilbert curve.
One example of this map design got up to wave 7,419.